Webcam Object Detection with Mask R-CNN on Google Colab

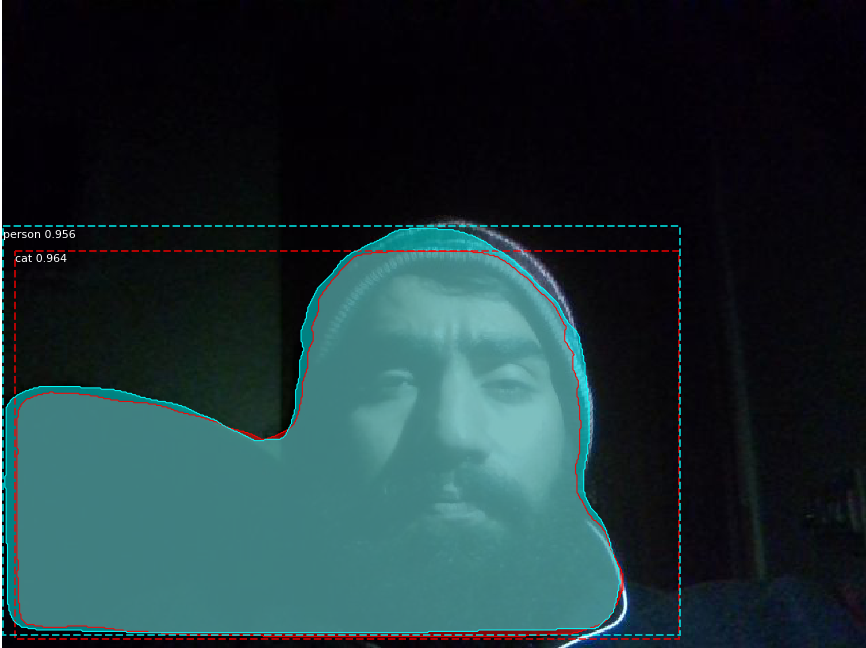
Mask R-CNN algorithm in low light - thinks it sees a cat ¯\_(ツ)_/¯
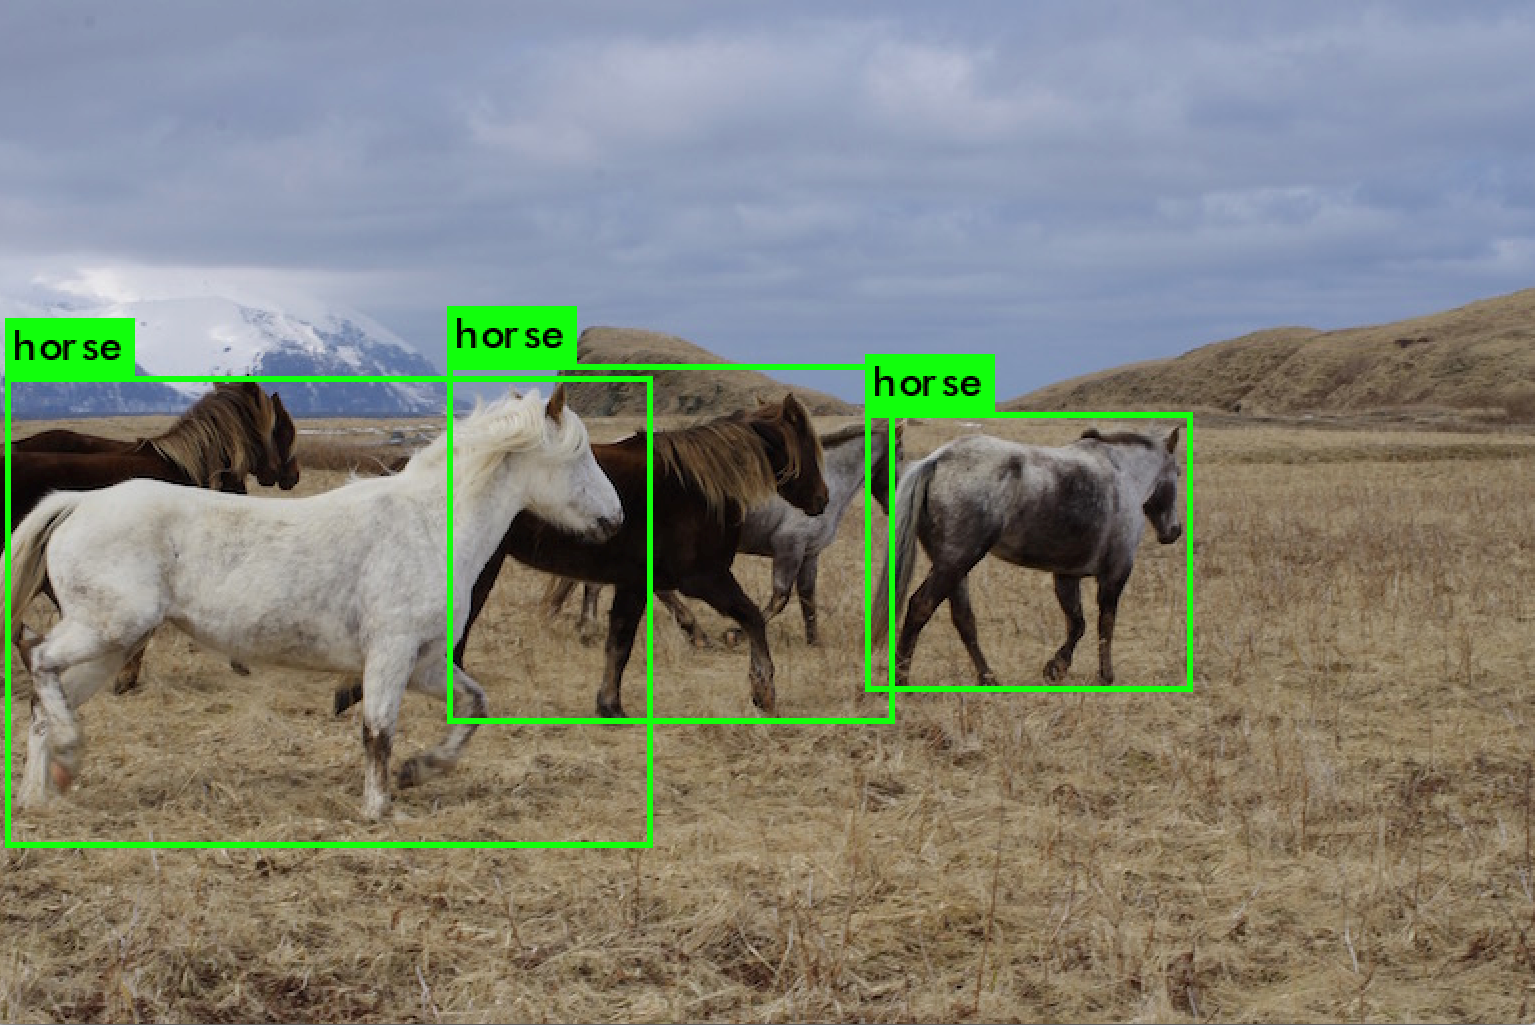
There are plenty of approaches to do Object Detection. YOLO (You Only Look Once) is the algorithm of choice for many, because it passes the image through the Fully Convolutional Neural Network (FCNN) only once. This makes the inference fast. About 30 frames per second on a GPU.

Object bounding boxes predicted by YOLO (Joseph Redmon)
Another popular approach is the use of Region Proposal Network (RPN). RPN based algorithms have two components. First component gives proposals for Regions of Interests (RoI)… i.e. where in the image might be objects. The second component does the image classification task on these proposed regions. This approach is slower. Mask R-CNN is a framework by Facebook AI that makes use of RPN for object detection. Mask R-CNN can operate at about 5 frames per second on a GPU. We will use Mask R-CNN.
Why use a slow algorithm when there are faster alternatives? Glad you asked!
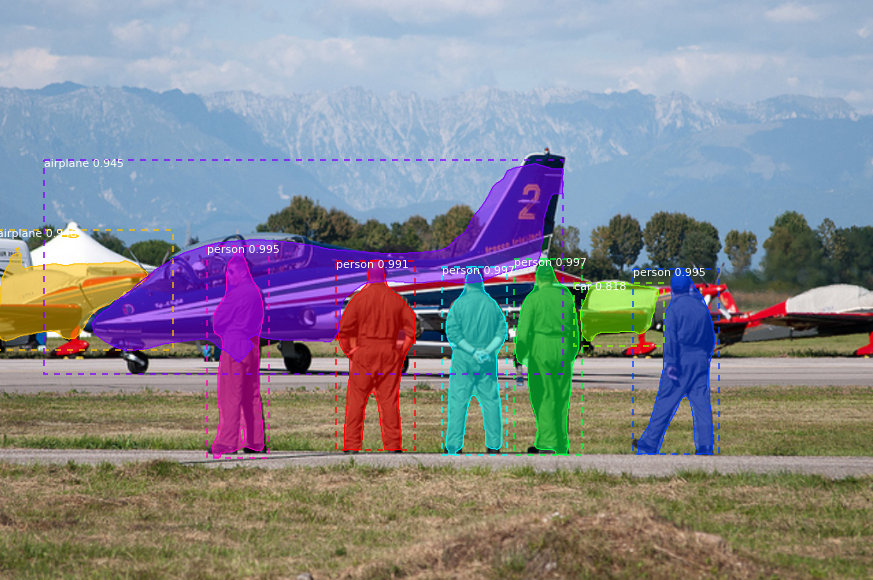
Mask R-CNN also outputs object-masks in addition to object detection and bounding box prediction.

Object masks and bounding boxes predicted by Mask R-CNN (Matterport)
The following sections contain explanation of the code and concepts that will help in understanding object detection, and working with camera inputs with Mask R-CNN, on Colab. It’s not a step by step tutorial but hopefully it would be as effective. At the end of this article, you will find the link to Colab notebook to try it yourself.
Matterport has a great implementation of Mask R-CNN using Keras and Tensorflow. They have provided Notebooks to play with Mask R-CNN, to train Mask R-CNN with your own dataset and to inspect the model and weights.
Why Google Colab
If you don’t have a GPU machine, or don’t want to go through the tedious task of setting up the development environment, Colab is the best temporary option.
In my case, I had lost my favorite laptop recently. So, I am on my backup machine - a windows tablet with a keyboard. Colab enables you to work in a Jupyter Notebook in your browser, connected to a powerfull GPU or a TPU (Tensor Processing Unit) virtual machine in Google Cloud. The VM comes pre-installed with Python, Tensorflow, Keras, PyTorch, Fastai and a lot of other important Machine Learning tools. All for free. Beware that your session progress gets lost due to a few minutes of inactivity.
Getting started with Google Colab
The Welcome to Colaboratory guide gets you started easily. And the Advanced Colab guide comes in handy when taking input from camera, communicating between different cells of the notebook, and communication between Python and JavaScript code. If you don’t have time to look at them, just remember the following.
A cell in Colab notebook usually contains Python code. By default the code runs inside /content directory of the connected Virtual Machine. Ubuntu is the operating system of Colab VMs and you can execute system commands by starting the line of the command with !.
The following command will clone the repository.
!git clone https://github.com/matterport/Mask_RCNN
If you have multiple system commands in the same cell, then you must have %%shell as the first line of the cell followed by system commands. Thus, the following set of commands will clone the repository, change the directory to Mask_RCNN and setup the project.
%%shell
# clone Mask_RCNN repo and install packages
git clone https://github.com/matterport/Mask_RCNN
cd Mask_RCNN
python setup.py install
Import Mask R-CNN
The following code comes from Demo Notebook provided by Matterport. We only need to change the ROOT_DIR to ./Mask_RCNN, the project we just cloned.
The python statement sys.path.append(ROOT_DIR) makes sure that the subsequent code executes within the context of Mask_RCNN directory where we have Mask R-CNN implementation available. The code imports the necessary libraries, classes and downloads the pre-trained Mask R-CNN model. Go through it. The comments make it easier to understand the code.
import os
import sys
import random
import math
import numpy as np
import skimage.io
import matplotlib
import matplotlib.pyplot as plt

# Root directory of the project
ROOT_DIR = os.path.abspath("./Mask_RCNN/")

# Import Mask RCNN
sys.path.append(ROOT_DIR)  # To find local version of the library
from mrcnn import utils
import mrcnn.model as modellib
from mrcnn import visualize

# Import COCO config
sys.path.append(os.path.join(ROOT_DIR, "samples/coco/"))  # find local version
import coco

%matplotlib inline

# Directory to save logs and trained model
MODEL_DIR = os.path.join(ROOT_DIR, "logs")

# Local path to trained weights file
COCO_MODEL_PATH = os.path.join(ROOT_DIR, "mask_rcnn_coco.h5")
# Download COCO trained weights from Releases if needed
if not os.path.exists(COCO_MODEL_PATH):
    utils.download_trained_weights(COCO_MODEL_PATH)

# Directory of images to run detection on
IMAGE_DIR = os.path.join(ROOT_DIR, "images")
Create Model from Trained Weights
Following code creates model object in inference mode, so we could run predictions. Then it loads the weights from the pre-trained model that we downloaded earlier, into the model object.
# Create model object in inference mode.
model = modellib.MaskRCNN(mode="inference", model_dir=MODEL_DIR, config=config)

# Load weights trained on MS-COCO
model.load_weights(COCO_MODEL_PATH, by_name=True)
Run Object Detection
Now we test the model on some images. Mask_RCNN repository has a directory named images that contains… you guessed it… some images. The following code takes an image from that directory, passes it through the model and displays the result on the notebook along with bounding box information.
# Load a random image from the images folder
file_names = next(os.walk(IMAGE_DIR))[2]
image = skimage.io.imread(os.path.join(IMAGE_DIR, random.choice(file_names)))

# Run detection
results = model.detect([image], verbose=1)

# Visualize results
r = results[0]
visualize.display_instances(image, r['rois'], r['masks'], r['class_ids'],
                            class_names, r['scores'])
The result of prediction
Processing 1 images
image                    shape: (425, 640, 3)         min:    0.00000  max:  255.00000  uint8
molded_images            shape: (1, 1024, 1024, 3)    min: -123.70000  max:  151.10000  float64
image_metas              shape: (1, 93)               min:    0.00000  max: 1024.00000  float64
anchors                  shape: (1, 261888, 4)        min:   -0.35390  max:    1.29134  float32

Working with Camera Images
In the advanced usage guide of Colab, they have provided code that can capture image from webcam in the notebook and then forward it to the Python code.
Colab notebook has pre-installed python package called google.colab which contains handy helper methods. There’s a method called output.eval_js which helps us evaluate the JavaScript code and returns the output to Python. And in JavaScript, we know that there is a method called getUserMedia() which enables us to capture the audio and/or video stream from user’s webcam and microphone.
Have a look at the following JavaScript code. Using getUserMedia() method of WebRTC API of JavaScript, it captures the video stream of the webcam and draws the individual frames on HTML canvas. Like google.colab Python package, we have google.colab library available to us in JavaScript. This library will help us invoke a Python method using kernel.invokeFunction function from our JavaScript code.
The image captured from webcam is converted to Base64 format. This Base64 image is passed to a Python callback method, which we will define later.
async function takePhoto(quality) {
    // create html elements
    const div = document.createElement('div');
    const video = document.createElement('video');
    video.style.display = 'block';

    // request the stream. This will ask for Permission to access
    // a connected Camera/Webcam
    const stream = await navigator.mediaDevices.getUserMedia({video: true});

    // show the HTML elements
    document.body.appendChild(div);
    div.appendChild(video);
    // display the stream
    video.srcObject = stream;
    await video.play();

    // Resize the output (of Colab Notebook Cell) to fit the video element.
    google.colab.output
        .setIfrmeHeight(document.documentElement.scrollHeight, true);

    // capture 5 frames (for test)
    for (let i = 0; i < 5; i++) {
        const canvas = document.createElement('canvas');
        canvas.width = video.videoWidth;
        canvas.height = video.videoHeight;
        canvas.getContext('2d').drawImage(video, 0, 0);
        img = canvas.toDataURL('image/jpeg', quality);

        // Call a python function and send this image
        google.colab.kernel.invokeFunction('notebook.run_algo', [img], {});

        // wait for X miliseconds second, before next capture
        await new Promise(resolve => setTimeout(resolve, 250));
    }

    stream.getVideoTracks()[0].stop(); // stop video stream
}
We already discussed that having %%shell as the first line of the Colab notebook cell makes it run as terminal commands. Similarly, you can write JavaScript in the whole cell by starting the cell with %%javascript. But we will simply put the JavaScript code we wrote above, inside the Python code. Like this:
from IPython.display import display, Javascript
from google.colab.output import eval_js
from base64 import b64decode

def take_photo(filename='photo.jpg', quality=0.8):
    js = Javascript('''
        // ...
        // JavaScript code here <<==
        // ...
        ''')
    # make the provided HTML, part of the cell
    display(js)
    # call the takePhoto() JavaScript function
    data = eval_js('takePhoto({})'.format(quality))
Python - JavaScript Communication
The JavaScript code we wrote above invokes notebook.run_algo method of our Python code. The following code defines a Python method run_algo which accepts a Base64 image, converts it to a numpy array and then passes it through the Mask R-CNN model we created above. Then it shows the output image and processing stats.
Important! Don’t forget to surround the Python code of your callback method in
try / exceptblock and log it. Because it will be invoked by JavaScript and there will be no sign of what error occurred while calling the Python callback.
import IPython
import time
import sys
import numpy as np
import cv2
import base64
import logging

from google.colab import output
from PIL import Image
from io import BytesIO

def data_uri_to_img(uri):
    """convert base64 image to numpy array"""
    try:
        image = base64.b64decode(uri.split(',')[1], validate=True)
        # make the binary image, a PIL image
        image = Image.open(BytesIO(image))
        # convert to numpy array
        image = np.array(image, dtype=np.uint8);
        return image
    except Exception as e:
        logging.exception(e);print('\n')
        return None

def run_algo(imgB64):
    """
    in Colab, run_algo function gets invoked by the JavaScript,
    that sends N images every second, one at a time.

    params:
        image: image
    """
    image = data_uri_to_img(imgB64)
    if image is None:
        print("At run_algo(): image is None.")
        return

    try:
        # Run detection
        results = model.detect([image], verbose=1)
        # Visualize results
        r = results[0]
        visualize.display_instances(
            image,
            r['rois'],
            r['masks'],
            r['class_ids'],
            class_names,
            r['scores']
            )
    except Exception as e:
        logging.exception(e)
        print('\n')
Let’s register run_algo as notebook.run_algo. Now it will be invokable by the JavaScript code. We also call the take_photo() Python method we defined above, to start the video stream and object detection.
# register this function, so JS code could call this
output.register_callback('notebook.run_algo', run_algo)

# put the JS code in cell and run it
take_photo()
Try it yourself
You are now ready to try Mask R-CNN on camera in Google Colab. The notebook will walk you step by step through the process.
(Optional) For Curious Ones
The process we used above converts the camera stream to images in browser (JavaScript) and sends individual images to our Python code for object detection. This is obviously not real-time. So, I spent hours trying to upload the WebRTC stream from the JavaScript (peer A) to the Python Server (peer B) without success. Perhaps my unfamiliarity with the combination of async / await with Python Threads was the main hindrance. I was trying to use aiohttp as Python server that will handle WebRTC connection using aiortc. The Python library aiortc makes it easy to create Python as a peer of WebRTC.
Here is the link to the Colab notebook with incomplete effort of creating WebRTC server.
What’s next
Facebook AI Research is working on almost similar problem, but through simulations. The algorithm that can solve the navigation problem will have applications in Augmented / Virtual Reality, Security, Robotics, and tools for Visually Impaired people.
Facebook AI has effectively solved the task of point-goal navigation by AI agents in simulated environments, using only a camera, GPS, and compass data. Agents achieve 99.9% success in a variety of virtual settings, such as houses and offices. - @facebookai
In Part 2, we will use PlaneRCNN to extract the depthmap and surface planes from a single image. The next step will be to use this depthmap information to understand the environment around us, using the smartphone camera.
A Tiny Request
I am pretty new to Deep Learning and my approach to the problem could be very naive. If you think you or someone you know can advise me on how to approach the “Navigation for Visually Impaired” problem, please connect at emadulehsan@gmail.com.